The following content has been generously reviewed and approved by the following experts in Diversion Surgery & Ostomy Care:
Dr. Robin Boushey, BSc, MD, PhD, CIP, FRCSC, Assistant Professor of Surgery, Clinical Investigator at the Ottawa Health Research Institute in the Cancer Centre Program, Director of Research in the Division of General Surgery, University of Ottawa, The Ottawa Hospital – General Campus
Ms. Joy Baetz RNET, Registered Nurse, Enterostomal Therapist, Wound and Ostomy Specialist, President of The Oshawa and District Ostomy Association.
Ms. Muffy Truscott, United Ostomy Association of Canada, Regina Ostomy Chapter Executive, Newsletter
A GUIDE TO UNDERSTANDING AN OSTOMY
Colorectal cancer is one of the most highly diagnosed cancers in Canada. Surgical removal of the malignant tumor is the most common treatment for this cancer. The diseased portion of the colon and/or rectum is removed, and in most cases, the healthy portions are reattached (often referred to as anastomosis). Sometimes, that is not possible because of the extent of the disease or its location. In this case, a surgical opening is made through the abdomen to provide a new pathway for waste elimination. This is what is commonly referred to as an ostomy. Since a percentage of the colorectal cancer population may require an ostomy, it is with this in mind that the Colorectal Cancer Association of Canada has developed this guide to helping patients understand the different types of ostomies and the care required to properly manage them.
This guide will help you better understand ostomies – what they are, why they are required, how they affect the normal digestive process, and what changes they can bring to a person’s life. The content presented throughout the various sections appearing below will not only empower patients, but assist them throughout their various stages of the ostomy journey. Please click on the various sections appearing under the TABLE OF CONTENTS below to access the respective information.
TABLE OF CONTENTS
- Ileostomy
- Colostomy
- Ileoanal Reservoir
- Ilealconduit: Bladder Surgery
-
Indiana pouch: Bladder Surgery
-
-
End Ileostomy
-
Loop Ileostomy
-
End Ileostomy
IRRIGATION FOR DESCENDING AND SIGMOID COLOSTOMY
-
- PRESURGICAL EXPECTATIONS
- SURGICAL EXPECTATIONS
- POST SURGICAL EXPECTATIONS
- HOME RECOVERY
- OSTOMATES RECEIVING CHEMOTHERAPY
- PRESURGICAL EXPECTATIONS
-
-
-
-
-
-
-
PART I: OVERVIEW AND THE HUMAN DIGESTIVE SYSTEM
To understand how an ostomy works, it is helpful to know how the digestive tract normally works. Please see Figure I appearing below. The digestive system begins with the mouth, through which food enters. The esophagus, connecting the mouth to the stomach, transports food to the stomach, where digestive juices help break down the food. The food then travels through the small intestine. The liver and pancreas produce different digestive juices that are deposited in both the small intestine and the large intestine.
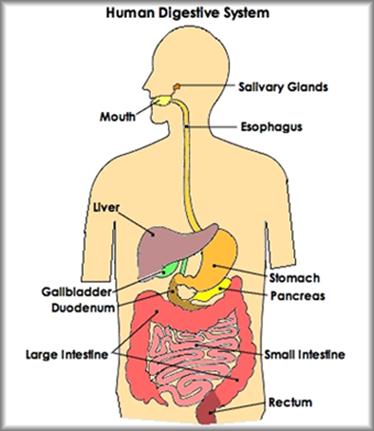
Figure 1: The Human Digestive System
Essentially, the human digestive system is a complex series of organs and glands that processes food. In order to use the food we eat, our body has to break the food down into smaller molecules that it can process; it also has to excrete waste that our body does not wish to hold on to. Most of the digestive organs (like the stomach and intestines) are tube-like and contain the food as it makes its way through the body. Therefore, the digestive system is much like a long, twisting tube that runs from the mouth to the anus, plus a few other organs (like the liver and pancreas) that produce or store digestive chemicals (juices and enzymes). Appearing below is a table (Table 1) containing a summary of the functions of the various digestive organs:
|
Functions of the Various Digestive Organs |
||
|
Mouth & Salivary Glands
|
|
The digestive process begins in the mouth. Food is partly broken down by the process of chewing and by the chemical action of salivary enzymes (these enzymes are produced by the salivary glands and break down starches into smaller molecules). Chewing begins to break down food while enzymes in saliva begin to break down carbohydrates. |
|
Esophagus
|
|
After being chewed and swallowed, the food enters the esophagus. The esophagus is a long tube that runs from the mouth to the stomach. It uses rhythmic, wave-like muscle movements (called peristalsis) to force food from the throat into the stomach. |
|
Stomach |
|
The stomach is a large, sac-like organ that churns the food and bathes it in a very strong acid (gastric acid). Food in the stomach that is partially digested and mixed with stomach acids is called chyme. |
|
Small intestine |
|
After being in the stomach, food enters the duodenum, the first part of the small intestine. It then enters the jejunum and then the ileum (the final part of the small intestine). In the small intestine, bile (produced in the liver and stored in the gall bladder), pancreatic enzymes, and other digestive enzymes produced by the inner wall of the small intestine help in the breakdown of food. Enzymes digest proteins, fats, & carbohydrates. Molecules are absorbed from the small intestine into the bloodstream. |
|
Pancreas |
|
The pancreas secretes digestive enzymes into the duodenum, the first segment of the small intestine. These enzymes break down protein, fats, and carbohydrates. The pancreas also makes insulin, secreting it directly into the bloodstream. Insulin is the chief hormone for metabolizing sugar. |
|
Liver |
|
The liver has multiple functions, but its main function within the digestive system is to process the nutrients absorbed from the small intestine. Bile from the liver secreted into the small intestine also plays an important role in digesting fat. In addition, the liver is the body’s chemical “factory.” It takes the raw materials absorbed by the intestine and makes all the various chemicals the body needs to function. The liver also detoxifies potentially harmful chemicals. It breaks down and secretes many drugs. |
|
Gall Bladder |
|
The gallbladder stores and concentrates bile, and then releases it into the duodenum of the small intestine to help absorb and digest fats. |
|
Large Intestine or Colon |
|
After passing through the small intestine, digested food passes into the large intestine. In the large intestine, some of the water and electrolytes (chemicals like sodium) are removed from the food. Many microbes (bacteria like Bacteroides, Lactobacillus acidophilus, Escherichia coli, and Klebsiella) in the large intestine help in the digestive process. The first part of the large intestine is called the cecum (the appendix is connected to the cecum). The cecum is the entry point for digested food that has been through the small intestine and is now a highly acidic liquid. It contains the ileocecal valve which keeps food from backing up into the ileum. Digested contents then travels upward in the ascending colon. Here the contents are an acidic liquid. This section of the large intestine goes up the right side of the abdomen. The digested content travels across the abdomen in the transverse colon where the contents are less acidic. The contents then go back down the left side of the abdomen in the descending colon, and then through the sigmoid colon. The bowel contents are formed in this section which goes down to the rectum – a storage area for the feces or waste. The large intestine absorbs water, minerals and forms the feces for elimination and is also responsible for gas formation. |
|
Rectum & Anus |
|
Solid waste is then stored in the rectum until it is excreted via the anus or opening. |


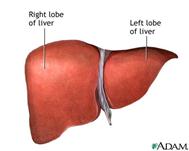


Table 1: Functions of the Various Digestive Organs
PART II (A): WHAT IS AN OSTOMY?
An ostomy is a surgically created opening connecting an internal organ to the surface of the body. Different kinds of ostomies are named for the organ involved. The most common types of ostomies in intestinal surgery are an “ileostomy” (connecting a part of the ileum or small intestine to the abdominal wall) and a “colostomy” (connecting a part of the colon, or large intestine, to the abdominal wall). An ostomy may be temporary or permanent. A temporary ostomy may be required if the intestinal tract cannot be properly prepared for surgery because of blockage by disease or scar tissue (See Figure 2 and 3). It may also be created to allow inflammation or an operative site to heal without contamination by stool.
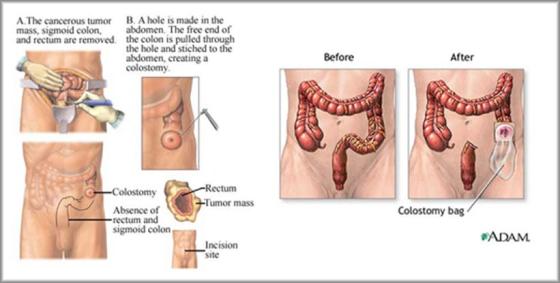
Figure 2: Surgical Resection of a Colorectal Tumor (Left) with the Resulting Ostomy (Right)
Temporary ostomies may be reversed with minimal or no loss of intestinal function. A permanent ostomy may be required when disease, or its treatment, impairs normal intestinal function or when the muscles that control elimination do not work properly or require removal. The most common causes of these conditions are low rectal cancer and sometimes anal cancer. As previously stated, an ostomy connects either the small intestine (ileum) or the large intestine (colon) to the surface of the abdominal wall whose end result is depicted in Figure 3:

Figure 3: An Ileostomy: Depicting the creation of an artificial opening on the abdominal wall where waste material passes out of the body.
A stoma (means opening) is a portion of your small or large intestine that has been brought through the surface of the abdomen (belly) which provides an alternative path for fecal waste to leave the body. A surgeon forms a stoma by bringing out a piece of bowel onto the abdomen and turns it back like a turtleneck and then sutures it to the abdominal wall. An ostomy flange and pouch with an adhesive backing is then attached over the stoma and worn on the abdomen to collect waste. It will require emptying throughout the day and completely changed at least once a week. See figure 4.
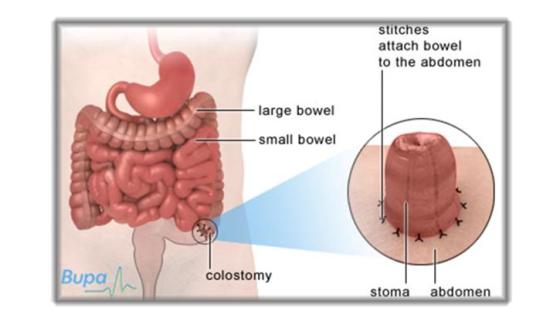
Figure 4: The position of a Stoma – An opening in the abdomen that is created by an operation (ostomy). It is usually covered by an external pouch that collects waste.
The stoma can be positioned at various locations on the abdominal wall, depending on which part of the bowel requires surgery.
- In the case of Descending colostomy (Descending colon), Sigmoid colostomy (Sigmoid colon) the stoma is usually situated on the lower left side of the abdomen (see Figure 5 below).
- If a Transverse colostomy is constructed (Transverse colon), the stoma is located in the upper abdomen. (See Figure 6 below)
- In the case of Ascending colostomy (Ascending colon) the stoma is placed on the lower right side of the abdomen. Rarely done.(See Figure 7)
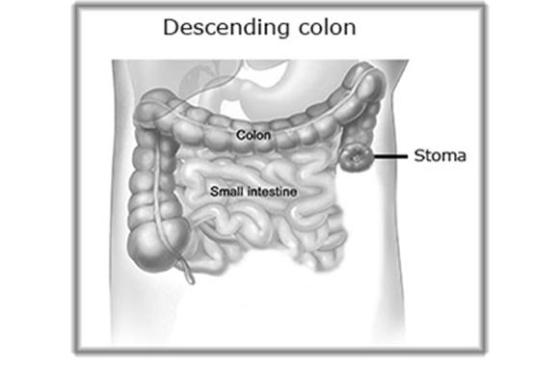
Figure 5: Showing a descending colostomy with partially removed sigmoid colon, rectum and anus.
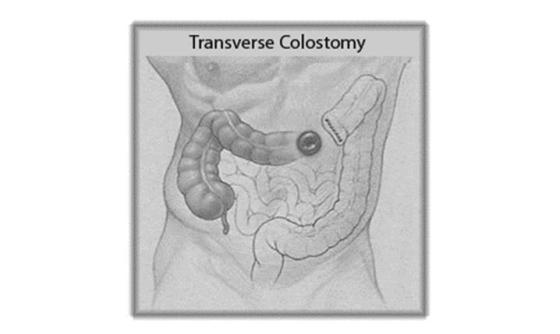
Figure 6: Figure depicting a Transverse Colostomy – With partial removal of the transverse colon, descending, sigmoid colon, rectum, and anus.

Figure 7: Ascending Colostomy – A relatively rare colostomy surgery opening in the ascending portion of the colon. It is located on the lower right side of the abdomen. There will be removal of transverse/descending/descending/sigmoid colon, rectum and anus (if permanent).
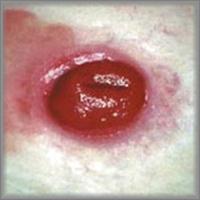
There are different types of stomas. They vary in size, shape, location and construction:
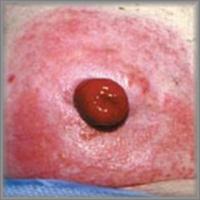
- End stoma: the bowel is cut, and the working end is brought through the abdomen to the skin surface. An end stoma has only one opening (i.e., one stoma – see photo A).

Photo A: End Stoma
- Loop Stoma: a loop of the bowel is brought through the abdomen to the skin surface and may be temporarily supported by a plastic bridge or rod. A loop stoma is a stoma where both the upstream (proximal – left side) and downstream (distal – right side) openings of the bowel are brought out through the same place on the abdominal wall (see Photo B). The proximal opening of the stoma drains waste from the intestine, while the distal opening of the stoma drains mucus from the part of the bowel (below the stoma opening) that leads to the anus. Old stool and mucus may drain from the rectum following surgery.


Photo B: Loop Stoma
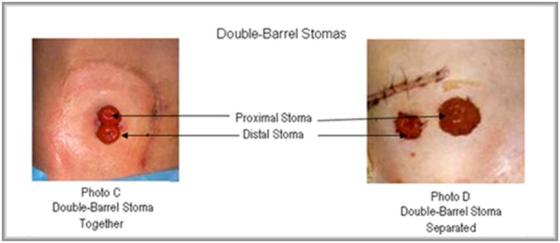
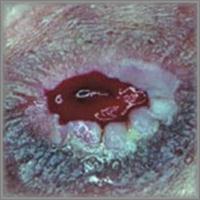
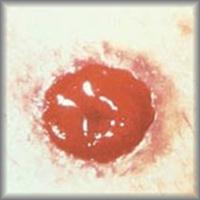
- Double Barrel Stoma (not frequently done): Two ends of the bowel are brought through the abdomen to the skin surface as two separate stomas.
The stomas may be very close to one another or separated by the skin surface.
(See photos C and D). As with loop stomas, one stoma is usually called the proximal stoma (stool elimination), while the other is called the distal stoma (mucus).
Depending on the reason for the surgery or the type of surgery performed, the surgeon will decide which kind of stoma is required. All three types are unique in how they are cared for, and it is important to take good care of the stoma. Please refer to Section V on Stoma Care and Maintenance found in this document.
Bowel diversion surgery, also referred to as the creation of an ostomy, allows stool to safely leave the body when – because of disease or injury – the colon is removed or needs time to heal. The type, degree, and location of bowel removed and, sometimes, personal preference, are all factors in determining which bowel diversion surgery is most appropriate. Several surgical options exist for bowel diversion. The following represent the different types of ostomy:
Ileostomy: Part of the ileum is brought out as a stoma. Watery waste (having a pasty consistency) flows out of the stoma and collects in an ostomy pouch, which must be emptied several times a day. An ileostomy bypasses the colon, rectum and anus. The ileum contains digestive enzymes and acids that may cause skin irritation. Therefore, extra care is needed with an ileostomy to keep waste materials from coming into contact with the skin on the abdomen. Having an ileostomy may make some people more prone to dehydration, which could lead to the loss of important minerals/nutrients/electrolytes your body needs. See Figure 8:

Figure 8: Depiction of an Ileostomy
Colostomy: Part of the colon is brought out as a stoma. As with an ileostomy, stool collects in an ostomy pouch. The stool is semi-solid to solid consistency.
Ileoanal reservoir surgery (pelvic pouch procedure) is an option when the large intestine is removed but the anus remains intact and disease-free. The surgeon creates a rectal-like pouch, called an ileoanal reservoir, from the last several inches (25-30 cm) of the ileum. Stool collects in the ileoanal reservoir and then exits the body through the anus during a bowel movement. People who have undergone ileoanal reservoir surgery initially have about 6 – 10 bowel movements a day. Two or more surgeries are usually needed, and a temporary ileostomy will be required. An adjustment period lasting several months is needed for the newly formed ileoanal reservoir to stretch and adjust to its new function. After the adjustment period, bowel movements decrease to as few as 4 to 6 a day (see figure 9).
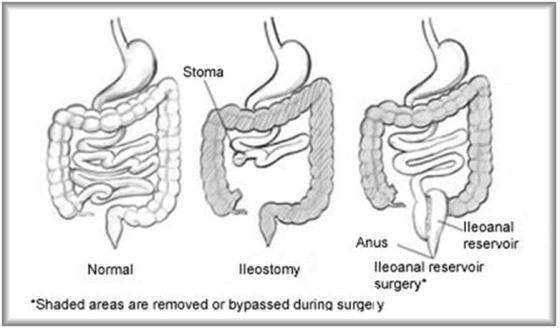
Figure 9: Different types of ostomy or bowel diversion surgeries
PART III (A): TYPES OF COLOSTOMY
A colostomy is created out of the end of the large intestine to divert waste from the digestive system. After having this type of surgery, waste will be passed through a stoma that is located on the abdomen. The location of the colostomy is determined by the location, type or surgery performed. Colostomies are identified by the portion of the colon that’s brought out through the skin as a stoma. For example, a sigmoid colostomy involves the sigmoid colon. The consistency of the stool that comes from a colostomy depends on where the intestine has been interrupted. If the ascending or transverse portion of the colon is brought out as a stoma, the stool will be loose or thick. If the lower end of the colon is brought out as a stoma, the stool will be more formed because more liquid has been absorbed in the colon. You may also experience constipation.
The pictures appearing below (Figures 10-16) depict the different areas in which a colostomy can be placed. Depending on the placement and reason for the colostomy, these can be permanent or temporary:
(i) Colostomy in the Ascending Colon: This is an uncommon type of colostomy. The output is liquid to semi-liquid and can be irritating to the skin (see figure 10). The stoma is usually placed on the right side of the abdomen. Only a short portion of colon remains active, resulting in the liquid output, or loose and runny stools. A drainable pouch is worn at all times. The stoma must be covered with a flange (barrier) and drainable pouch that protect the skin and collect the bowel contents. Caring for an ascending colostomy is much like caring for an ileostomy (as will be discussed in the following information).

Figure 10: Colostomy in the Ascending Colon
(ii) Colostomy in the Transverse Colon: The output is liquid to semi-formed and is usually constructed as a loop ostomy. The transverse colostomy is in the upper abdomen. See figure 11. Colon problems like diverticulitis, inflammatory bowel disease, cancer, obstruction (blockage), injury, or birth defects can lead to a transverse colostomy.
When the problems are in the lower bowel, the affected part of the bowel might need time to rest and heal. A transverse colostomy may be used to keep stool out of the area of the colon that is inflamed, infected, diseased, or newly operated on – this allows for healing to take place. Depending on the healing process, the colostomy may be needed for a few weeks, months, or even years. When healed,(depending on the cause) the colostomy is likely to be reversed (closed) and you will go back to having normal bowel function.
A permanent transverse colostomy is made when the lower portion of the colon must be removed or permanently rested. This type may also be needed if other health problems make the patient unable to have further surgery. This colostomy is a permanent exit for stool and will not be closed in the future.

Figure 11: Colostomy in the Transverse Colon
When a colostomy is made in the right half of the colon, only a short portion of colon leading to it is active. The type of discharge from a transverse colostomy varies from time to time and from person to person. A few transverse colostomies discharge firm stool at infrequent intervals, but most of them move fairly often and put out a liquid, soft or loose stool. It is important to know that the stool contains digestive enzymes that are very irritating, so much like an ascending colostomy; the nearby skin must be protected. Trying to control a transverse colostomy with special restrictive diets, medicines, enemas, or irrigations usually does not work and is not often recommended. An appliance or pouching system is worn over a transverse colostomy and collects the stool from the bowel and protects the skin.
Types of Transverse Colostomies:
- Loop transverse colostomy (Figure 12): The loop colostomy may look like one very large stoma, but it in fact has 2 openings. One opening puts out stool; the other only puts out mucus. A colon normally makes small amounts of mucus to protect itself from the bowel contents. The mucus passes with the bowel movements and is usually not noticed. Despite the colostomy, the resting part of the colon keeps making mucus that will come out either through the distal stoma or through the anus. This is normal and expected.

Figure 12: Loop Transverse Colostomy
- Double-barrel transverse colostomy (Figure 13): When creating a double-barrel colostomy, the surgeon divides the bowel completely. Two openings are brought to the surface as separate stomas. The 2 stomas may or may not be separated by skin. Here, too, one opening puts out stool and the other puts out only mucus (this smaller stoma is called a mucus fistula). Sometimes the mucus fistula is sewn closed at the time of surgery and left inside the abdomen. Hence, there is only one stoma and mucus from the resting portion of the bowel comes out through the anus.
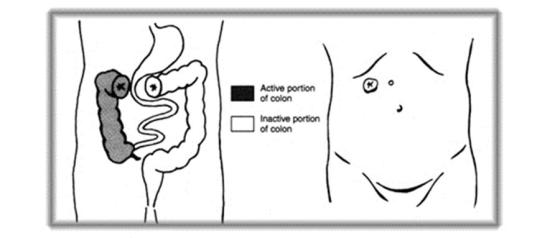
Figure 13: Double Barrel Transverse Colostomy
(iii) Colostomy in the Descending Colon: The output is semi-formed to formed due to more water being absorbed while in the ascending and transverse colon. Located at the end of the descending colon, the descending colostomy (Figure 14) is placed on the lower left side of the abdomen. Most often, the output is firm and can be controlled.
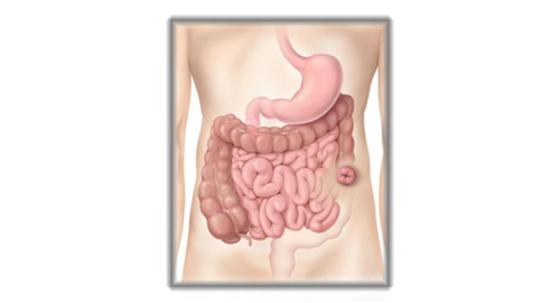
Figure 14: Colostomy in the Descending Colon
(iv) Sigmoid Colostomy: This colostomy is placed on the lower left portion of the abdomen. Output is formed. All water has been absorbed in the previous areas of the colon (see Figure 15). Because there is more working colon, it may produce more solid stool more regularly. The sigmoid colostomy is also one of the most common types of colostomy

Figure 15: Colostomy in the Sigmoid Colon
Figure 16 appearing below compares a descending and sigmoid colostomy.
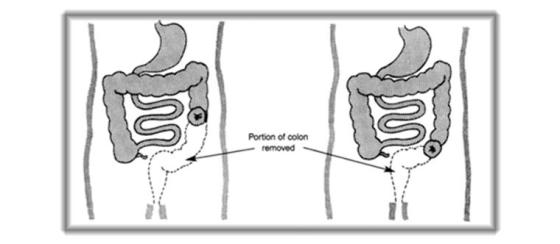
Figure 16: Descending Colostomy (left) and Sigmoid Colostomy (right)
Both the descending and the sigmoid colostomies can have a double-barrel or single-barrel opening. The single-barrel, or end colostomy, is more common. The stoma of the end colostomy is either sewn flush with the skin or it is turned back on itself (like a turtleneck and sewn to the skin).
Many descending and sigmoid colostomies can be trained to move regularly by irrigation.(see section on irrigation). Training, with or without stimulation, is likely to happen only in those people who had regular bowel movements before they became ill. If bowel movements were irregular in earlier years, it may be difficult, or impossible, to have regular, predictable function. Spastic colon, irritable bowel, and some types of indigestion are some conditions that cause people with colostomies to continue to have bouts of constipation or loose stool.
During the surgical creation of a colostomy, the surgeon makes an incision to examine the colon and possibly remove diseased areas. Sometimes the anus and rectum are removed and the anal area is permanently closed. A separate incision is made in the abdomen, and a section of colon is pulled through this opening and a stoma is made. A flange and pouch is securely fastened over the stoma. The body’s waste products then flow into the pouch, which will be emptied as needed and will be changed at least once a week.
A colostomy is created as a means of treating various disorders of the large intestine, including cancer, obstruction, inflammatory bowel disease, ruptured diverticulum, ischemia (compromised blood supply) or traumatic injury. Temporary colostomies are created to divert stool from injured or diseased portions of the large intestine, allowing rest and healing. Permanent colostomies are performed when the distal bowel (bowel at the farthest distance or left side) must be removed or is blocked and inoperable. Surgery will result in one of three types of colostomy placements:
End Colostomy. The functioning end of the intestine (the section of bowel that remains connected to the upper gastrointestinal tract) is brought out onto the surface of the abdomen, forming the stoma by cuffing the intestine back on itself like a turtleneck and suturing the end to the skin. A stoma is an artificial opening created on the surface of the body. The surface of the stoma is actually the lining of the intestine, usually appearing moist and red. The distal portion of bowel (now connected only to the rectum) may be removed, or sutured closed and left in the abdomen. An end colostomy is usually a permanent ostomy, resulting from trauma, cancer or another pathological condition. See Figure 17. The types of procedures requiring a diversion in colorectal cancer patients are as follows (a thorough discussion of the procedures may be found at http://www.colorectal-cancer.ca/en/treating-cancer/treatment-cancer/):
- Abdominal Perineal Resection
- Low Anterior Resection with Temporary Ileostomy
- Hartman Procedure (rectal stump remains for possible reversal of the ostomy).
- Palliative Stomas
- Total Proctocolectomy (is the removal of the rectum and all or part of the colon) with Ileostomy
This procedure is most commonly performed to manage cancer of the lower rectum or anus. For example, a very low rectal cancer will require resection of the rectum and anus (abdominoperineal excision of rectum). The remaining descending and sigmoid colon is mobilized and the cut end brought to the abdominal surface at an opening about 2 cm across.
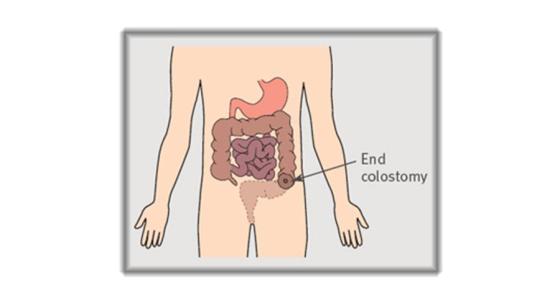
Figure 17: Abdominoperineal excision of the rectum and End Colostomy
If the anus, rectum, and a portion of the lower colon have not been removed, as in Hartmann’s procedure, two outcomes are possible. In the first, the distal, non-functioning part of the colon and the rectum can be stapled or sewn closed and left inside the abdomen as a rectal stump (Figure 18). The proximal (right side) colon is then taken out as an end colostomy. Because the rectum has not been removed, the urge to have a bowel movement may occur. Mucus and some old stool, if present, will be passed. If the colostomy is temporary, a second operation is needed to reconnect the two ends of the bowel.
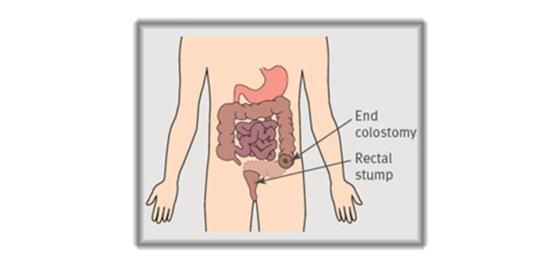
Figure 18:
Hartmann’s procedure
Less commonly, two separate stomas may be created. One stoma is the exit of the functioning part of the colon through which stool and gas pass. The second stoma opens into the non-functioning portion of the colon and rectum and is called a mucous fistula (Figure 19). The second stoma is usually small, flat, pink-red in colour, and moist, and it produces only mucus.
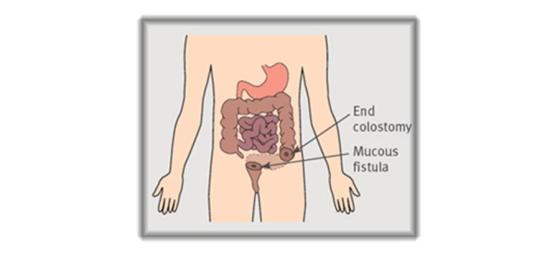
Figure 19:
Hartmann’s procedure and mucous fistula
PART III (B): TYPES OF ILEOSTOMY
(i) End Ileostomy: When the entire colon, rectum, and anus must be removed (panproctocolectomy), an end ileostomy must be performed. This occurs most commonly in severe ulcerative colitis but also in familial polyposis and some cases of colorectal cancer (for example, hereditary non-polyposis colorectal cancer). The ileum is resected just short of its junction with the cecum, and 6-7 cm of the small bowel is brought through the abdominal wall, usually in the right iliac fossa (lower right side of the abdomen). It is everted to form a spout and then sutured to the bowel wall. This technique of turning the small bowel inside out to create a spout was pioneered in the 1950s by the English surgeon Bryan Nicholas Brooke to protect the skin from the irritating content of the ileal fluid. See Figures 20 and 21.
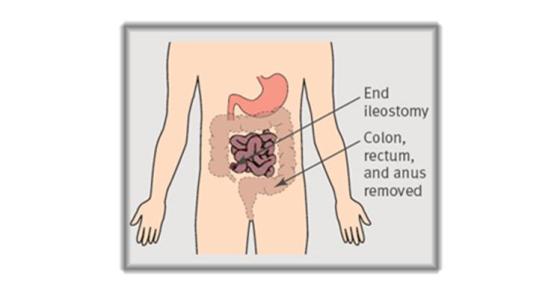
Figure 20: End ileostomy

Figure 21:
An everted spout stoma (ileostomy) and a flush stoma (colostomy)
After a panproctocolectomy,( the removal of the entire colon, rectum and anal canal) the ileostomy is permanent.
PART III (C): IRRIGATION FOR DESCENDING AND SIGMOID COLOSTOMY
Irrigation is a procedure some patients may want to consider in the management of their colostomy if they have a descending or sigmoid colostomy. It is a procedure (intestinal enema), where water is instilled into the colon through the stoma. As with a regular enema, the water allows the waste to flush out of the colon. Irrigation is usually performed once a day or less, but it varies from person to person. Irrigation works on the principle that if all or most of the large bowel is emptied at one time, it will take 24-48 hours for stool to output again. In between irrigations, the stoma is inactive, or produces very small amounts of stool. Therefore, people who irrigate usually do not wear a pouch, but rather a much smaller stoma cap, since the output between irrigations is minimal. One should consult their doctor or ET Nurse (Enterostomal Therapy Nurse) before performing irrigation.
The whole procedure takes approximately 45-60 minutes but for some it may be shorter or longer. However, it may be worthwhile to do it if you have the time and patience. Remember to check with your doctor or nurse to determine if it is right for you. A descending or sigmoid colostomy is required to be able to irrigate.
Some supplies or equipment are needed to begin irrigation. Prepare all equipment before starting to irrigate.
1. An irrigation kit includes: a bag for warm water, a tube and a soft cone adapter for the stoma
2. A long plastic sleeve or a pouch that will attach to your flange (replacing your regular pouch while irrigating). This pouch will collect the stool that is eliminated with irrigation.
3. Paper towels, wash cloth or wet wipes for cleaning up any spill of stool.
4. Disposable bags, a stoma cap or regular pouch to put over the stoma once the irrigation is complete.
5. A basin or sink of water to use if you need to clean around the stoma. The water should be luke-warm or at room temperature.
6. Air freshener helps to remove odor.
7. This should be done in the bathroom as you are going to need a toilet to use during the irrigation to dispose of the stool that comes out of the bowel.
The water in the bag that is used to irrigate must be at room temp or at approximately 37º C or 98.6º F, allowing for the water to be warm and NOT hot. The bowel runs the risk of being burnt if the water is too hot. The warmth of the water helps to loosen the stool allowing for the stool to exit. A number of manufactures make pouches with thermometers built into them so you can regulate the temp of the water.
Most people irrigate while sitting on the toilet. Some people have other positions. Also keep in mind that the water bag has to be elevated so it can stream into the stoma: Over your head if you are sitting down is best. A strong and sturdy hook on the wall or some other kind of means to hang it so it is within easy reach and at an appropriate height for you to irrigate, is recommended.

Photo E: Irrigation Process
Irrigation can be safely commenced once your incisions and stoma have healed completely. If you are required to undergo chemo or radiation after surgery it may be advisable to wait until you have completed treatment before trying irrigation, although in some cases where patients tolerate treatment well, you might be able to start sooner. You will need to contact your ET nurse for an appointment to receive instruction on technique and what equipment to purchase. (If you want the nurse to do the procedure with you for the first time, you should let them know so they can book an adequate amount of time for your session. Otherwise, you can start at home after verbal instruction.)
The American Cancer Society has developed thorough instructions on basic irrigation tips and may be accessed by clicking on the following link: http://www.cancer.org/Treatment/TreatmentsandSideEffects/PhysicalSideEffects/Ostomies/ColostomyGuide/colostomy-irrigation . The United Ostomy Association of America, The United Ostomy Association of Canada www.ostomycanada.ca have dedicated a forum to irrigation and may be accessed by clicking on the following link: https://www.ostomy.org/forum/viewforum.php?f=12
PART IV: PRE AND POST SURGICAL EXPECTATIONS
You will receive instructions from your surgeon on how to prepare in the days leading up to your surgery. If you are taking other medications, your surgeon may ask you to contact the prescribing physician for instructions on either continuing, discontinuing or adjusting the dose of drugs during your surgery and convalescence. The anesthetist will render a decision on the cessation of any medications before or on the day of the surgery. It is important to make the surgeon aware of all medications you are taking as some may inhibit the healing process (such as prednisone) or interact with other drugs.
You also may need to have certain routine examinations prior to your surgery such as a physical and a chest x-ray. This is referred to and is part of the Pre-Assessment Appointment. You should also meet with an Enterostomal Therapy (ET) Nurse who has a wealth of information about life with an Ostomy. In the initial meeting, you may discuss where your stoma will be placed on your abdomen, what kind of supplies you will need immediately after surgery, and how to best fit your ostomy into your lifestyle. The ET nurse will answer any of your questions to help you better understand changes that may occur after you have your ostomy.
In order to empty and cleanse the bowel, you may be placed on a low residue diet for several days prior to surgery. A liquid diet may be ordered for at least the day before surgery, with nothing by mouth after midnight. Colostomy surgery will often require a bowel prep to clean out the colon. In the day or two prior to surgery, you will follow your surgeon’s instructions to remove all stool from your colon, much as if you were preparing for a colonoscopy. This may be accomplished through fasting, enemas, laxatives, any of the standard bowel preps. You may also be asked to take antibiotics or other medications to prevent infections prior to, during, and after the surgery.
A nasogastric tube or NG tube (see Figure 22), may be inserted from the nose to the stomach on the day of surgery or during surgery to remove gastric secretions and prevent nausea and vomiting. A urinary catheter (a thin plastic tube) is inserted through the urethra (opening to the bladder) to keep the bladder empty during surgery, giving more space in the surgical field and decreasing chances of accidental injury.

Figure 22: Insertion of a Nasogastric Tube
Directly before surgery you will receive an IV to receive fluids and anesthetic. The surgery itself will last several hours. When you awaken, an ostomy pouch will be attached to your abdomen over your new stoma, and you may also have one or more drainage tubes. After some time in recovery and your condition is stable, you will be moved to your hospital room. However, should you require more monitoring; you may go to an Intensive Care or Step Down Unit.
For the first few days after surgery, you will continue to receive pain medication through your IV or epidural. Nurses may help you out of bed to stand or to sit in a chair a few days after surgery or even the very next day, depending on your condition. Standing and walking as soon as possible is very important to the recovery process, even though it will be uncomfortable at first.
When deemed appropriate, you may be given some clear liquids to eat such as broth, gelatin, and juice. If the clear fluids are tolerated well, the doctor will let the staff know that the diet can progress to full liquids or solid food.
Post-operative care for you with a new ostomy, as with those who have had any major surgery, involves monitoring of blood pressure, pulse, respirations and temperature. Breathing tends to be shallow because of the effect of anesthesia and your reluctance to breathe deeply and experience pain that is caused by the abdominal incision. You will be instructed how to support the operative site during deep breathing and coughing, and given pain medication as necessary. Fluid intake and output is measured, and the operative site is observed for color and amount of wound drainage. The nasogastric tube will remain in place, attached to low intermittent suction until bowel activity resumes. For the first 24–48 hours after surgery, the colostomy will drain bloody mucus. Fluids and electrolytes are infused intravenously until your diet is gradually resumed, beginning with liquids. Usually within 72 hours, passage of gas and stool through the stoma begins. Initially the stool is liquid, gradually thickening as you begin to take solid foods. You may be discharged from hospital in 2 to 4 days but sometimes longer depending on how well you progress following surgery.
An ostomy pouch will have been placed over the stoma on your abdomen after the surgery. During the hospital stay, you and your caregivers will be educated on how to care for the ostomy. Determination of appropriate pouching supplies and a schedule of how often to change the pouch will be established. Regular assessment and meticulous care of the skin surrounding the stoma is important to maintain an adequate surface on which to apply the pouch. Home care is arranged with ET consultation which is requested.
The ET nurse may also visit you before you leave the hospital to help you learn more about taking care of your stoma and changing your ostomy pouch. You will also want to know where you can obtain your ostomy supplies and any special instructions about your ostomy appliance. The ET nurse may offer the UOAC visitor program so that you may speak with someone who has an ostomy. Information about UOAC support groups, available funding, private insurance, diet, clothing, sexuality, intimacy, ostomy clinics. Your ET nurse will help you learn how to live independently with your ostomy.
Often, an Enterostomal therapist nurse will visit you at home after discharge to help with your resumption of normal daily activities. Recovery at home is generally six to eight weeks, although it may be longer if you were very ill before surgery or if you have post operative complications. Activity will be restricted at first, and heavy lifting, housework, and driving are not recommended. Before being discharged, the hospital staff will advise you about your diet when you first get home. Regular appointments with your surgeon will help ensure that your perineum, or abdomen and the area around the stoma are healing well.
You will be learning to take care of your stoma during the first few weeks of recovery. Your ET nurse will answer any questions, and may help you with your first few appliance changes and arrange for samples of products that may provide other options for you.
Your doctor will let you know when you are ready to resume your regular activities at work, school or home. If your stoma is going to be reversed, your surgeon will help you decide when that is possible based on your recovery as well as your own schedule.
You can expect to return to your normal daily activities after you have fully recovered from your operation. You should be able to return to the same job. If your work is strenuous and involves heavy lifting or puts a strain on your abdominal muscles, you should first seek advice about wearing proper support which may be a hernia support belt. Your ET nurse can measure you for this belt and then you may purchase one at your local store where you purchase your other ostomy supplies. You can resume sports – even swimming. A stoma guard may be useful if you are playing contact sports and there are special smaller pouches you may be able to wear. Many people become more active once they have a stoma, as their symptoms are relieved.
E. RECEIVING CHEMOTHERAPY WITH AN OSTOMY
What chemotherapy drugs your oncologist decides you should receive will vary depending on the stage of your colorectal cancer. You will be coached regarding how to deal with potential side effects. Chemo drugs may have no effect on your skin or stoma, or you may experience some changes (in both ileostomies and colostomies) that may include:
Peristomal skin reactions
- Skin is more difficult to heal due to increased or decreased blood counts. Take extra care when removing the flange — use two hands
- Chemotherapy may cause deep red or purple skin discoloration under the flange. Small red spots may appear under
the barrier (flange) due to decreased platelet counts as on other areas of skin — let your physician know if this occurs.
Stoma Reactions
- Stomatitis – small ulcers may appear on the stoma as on the rest of the gastrointestinal tract. Your physician may recommend that stoma irrigation be stopped until stomatitis resolves itself. Don’t use solvents or irritating substances on the stoma.
- Due to decreased platelet count, the stoma may bleed when touched. Pressure to the stoma and the use of and alginate such as Kaltostat may help to stop the bleeding.
- Peristomal skin may be more prone to infection.
Diarrhea
- Possible reaction to chemotherapy; monitor amount of stool output; inform physician if increased significantly above normal.
- Drink adequate amounts of fluids. Nausea can sometimes make drinking enough fluids difficult; if you’re having trouble, be sure
you’re taking your anti-nausea medication properly.
- Eat foods to help thicken stool, i.e. applesauce, cheese, white rice, bananas, peanut butter, plain tea and boiled milk.
- Stay away from fatty foods, highly spiced foods and foods or beverages which cause gas or cramping.
- Potassium is lost in diarrhea and needs to be replaced. Foods high in potassium include orange juice, potatoes, bananas, soybeans, avocados, apricots, pomegranates, parsnips and turnips. Gatorade and similar sports drinks do not have high amounts of potassium, but can be helpful if that’s all you can get down.
Constipation and a Colostomy.
An Ileostomy should never be constipated. If not functioning you may have a blockage. (See information under Ileostomy Blockage)
- An occasional reaction to chemotherapy is constipation (may also be a reaction to some pain medications containing codeine)
- Drink adequate amounts of fluid, (6 to 8 glasses a day.)
- Prune juice daily may be helpful.
- Eat foods with a laxative effect, i.e.: raw fruits and vegetables, chocolate, coffee, cereals, bran, whole wheat bread, dried
fruit and nuts. (Remember to be cautious and eat dried fruit, nuts and raw foods in moderation. Start with small amounts
and chew THOROUGHLY.)
- Try to stay away from strong laxatives
A. Caring for a Stoma – General
Your Enterostomal Therapist Nurse (ETN) will show you how to care for your stoma and the skin around it. A number of different protective pastes, barriers and powders are available. Your ETN will show you how to use these, and what to do if your skin becomes damaged or sore.
Stoma care is very important and there are a few problems that people with an ostomy may encounter. The most important problem of having a stoma is the psychological one. Some people find it very hard to adjust to having a stoma and get shy or sad because they feel different or unattractive in some way. Though this is a perfectly normal reaction, it is not the case! There are specialists and special trained nurses that can take you throughout this entire process and you can find the best comfort in their professionalism. They do help a great deal. A good idea is to surf the internet and find others who are or have been, in similar circumstances with the same type of ostomy that you have. You can learn from them on how to deal with your problem, and how to take care of your stoma. Psycho/social support is also available and may be accessed with the help of your surgeon or ET Nurse.
Another problem having a stoma is the odor. The pouches are odor proof and there should not be any odor except when the pouch is being emptied which is common whether a person has an ostomy or not. If you experience an odor you should check to see if there is a leak under your flange or pouch. Although some foods can cause an odor you can still enjoy them. Foods such as fish, eggs and beer can cause excessive gas and can cause your pouch to expand but having a filter in your pouch can help eliminate this. Try to keep a healthy and rich diet every day because it is very important in your recovery. Section VI of this document deals with nutrition and diet and may be of assistance to you. Another common problem is taking care of the skin around the stoma. Your ET Nurse can assist you with any skin breakdown you may experience. The problems with your skin may be as a result of a poor fitting flange and possibly the need for a flange with convexity. Some lotions may prevent the flange from sticking so care needs to be taken when applying. There is also a range of different pouches and hypoallergenic protective skin barriers that can help you.
Some practical care tips regarding stoma care may include some or all of the following:
-
Try to choose an outfit that will not affect the pouch, or the stoma. Your belt should not rest on the stoma.
-
Initially, there may be some dietary restrictions for the first 6 to 8 weeks following your surgery. After that time try small portions of food to make sure that you do not have any issues with a blockage especially if you have an Ileostomy.
-
Life with a stoma is not hard if you are well informed and know how to take care of the stoma.
-
If you encounter difficulties, do not be afraid to seek advice from people more informed than you, such as a nurse, doctor or ET nurse.
-
An ostomy should prevent you from leading a normal family life.
-
Recreation with a stoma must be as normal as possible. Resume normal/routine activities including sports.
-
Once you feel better, you should be encouraged to resume a social life comparable to what it was before surgery.
-
You can travel as much as you want, just remember to pack extra ostomy supplies in your carryon luggage.
-
Whether by car, plane or other means of transport, you can move without any restriction on destination, your stoma will not affect this.
-
You can swim in the sea or the pool after you have healed from your surgery.
-
The stoma may bleed when cleaning or changing your flange due to the large blood supply that goes to your stoma. If you have difficulty stopping the bleeding a cold cloth and light pressure will help to stop the bleeding. This rarely happens.
-
You can shower or take a bath with an ostomy. If you shower or bathe without your flange on remember to wash the soap off your skin before applying the flange so that it will stick. A residue of soap may prevent the flange from sticking.
-
Stoma or not, you must keep your style. You can adjust the ostomy pouch to suit your daily activities (sports, travel, work…).
-
Eating at regular hours, calmly and slowly is recommended to decrease gas and prevent a blockage.
-
Drink at least 1.5 to 2 liters per day).
-
Eat a balanced diet. Learn to recognize foods that give you gas, accelerate or slow down your transit.(the speed the stool passes into the pouch).
-
In case of constipation or diarrhea, drink plenty of fluids and consult with your physician about anything else that may be done.
-
Avoid combat sports like boxing, karate, wrestling unless protective gear is worn. Stoma guards are available to protect the stoma.
An ostomy appliance, or pouch, is designed to contain eliminated fecal material (waste). The pouch is made of plastic and is attached to the body with an adhesive. The adhesive, in turn, protects the skin from moisture. The pouch is disposable and is emptied or changed as needed. The system is quite secure; “accidents” are not common, and the pouches are odor-free.

Figure 23: An ostomy appliance is a pouch, attached to the body with an adhesive skin barrier that collects and stores waste in an odor free manor.
(i) Protecting the skin around the stoma
The skin around your stoma should always look the same as skin anywhere else on your abdomen. A colostomy that puts out firm stool usually causes few, if any, skin problems. If the stool is loose, as is often the case with an ileostomy and ascending colostomy, it can make the skin around the stoma tender and sore if leakage occurs under the skin barrier. Here are some ways to keep the skin healthy:
- Use the right size skin barrier (flange) opening. An opening that is too small can cut or injure the stoma and may cause it to bleed and swell. If the opening is too large, stool will sit on the skin and may cause irritation. In both cases, change the skin barrier (flange) and replace it with one that fits well about 1/8th of an inch larger than the stoma.
- Change the pouching system regularly to avoid leakage and skin irritation. Itching and burning are signs that the pouching system should be changed and the skin cleansed. Itching may also be a sign of yeast on the skin. The average time between changes is 5 to 7 days.
- Do not pull the pouching system away from the abdomen or remove it more than once a day unless there is a problem. There are closed end colostomy pouches that are changed once a day but the adhesive is less aggressive and should not cause irritation. Remove the barrier (flange) gently by pushing the skin away from the barrier rather than pulling the barrier off the skin.
- Clean the skin around the stoma with warm water. If needed, you can use a mild soap and rinse well. Pat dry before putting on the new barrier/pouch.
-
Watch for sensitivities and allergies to the products placed on your skin. They can develop after weeks, months, or even years of using a product because you can become sensitized over time. If your skin is irritated only where the plastic pouch touches it, you might consider trying a pouch cover. These are available from supply manufacturers, or you can make your own.
You may have to test different products to see how your skin will react to them. If you feel comfortable testing yourself, follow the directions under “Patch testing” that follow. If you are not comfortable doing this on your own and the problem continues, talk to your doctor or ET Nurse.
(ii) Patch testing
Place a small piece of the material to be tested on the skin of your abdomen or upper chest, far away from the stoma. If the material is not self-sticking, attach it with an adhesive tape that you know you are not allergic to (Figures 24 and 25). Leave it on for 48 hours.

Figure 24 – 27: Upper Left – Patch Testing Without Adhesive Tape; Upper right – Patch Testing With Adhesive Tape; Bottom Left – Reaction to the Tested Material; Bottom Right – Reaction to the Tape Only
Gently remove the patch at the end of 48 hours and look for redness or spots under the patch. If there is no redness after 48 hours, it is generally safe to use the product. But, in a few cases, reactions that took longer than 48 hours to show up have been reported (Figure 26).
Itching or burning before 48 hours pass is a sign of sensitivity. Remove the material right away and wash your skin well with soap and water.
A reaction to the tape is also possible. If this is the case, the redness or other irritation will only be in the area outlined by the tape (Figure 27).
If you seem to be allergic to a certain product, try one made by another company and patch test it as well. You will probably find one that works for you. Allergies are not as common as is irritation caused by using a product the wrong way. For this reason, always read the directions that come with the product. When in doubt, check with your ET nurse or doctor.
If you do not experience a positive reaction (such as redness/rash/itchiness) to the products tested, but the skin around the stoma remains irritated, talk to your ET nurse or doctor. There could be other reasons the skin is irritated (i.e. chemotherapy-related).
(iii) Spots of blood on the stoma
Spots of blood are not a cause for alarm. Cleaning around the stoma as you change the pouch or skin barrier may cause slight bleeding. There is a large blood supply to the stoma and it can bleed easily but the bleeding should stop quickly. Occasionally there are small raised areas on the stoma that may bleed a lot. These are called granulomas and may have to be removed by your ET nurse using Silver Nitrate.
(iv) Shaving hair under the flange
Having a lot of hair on the skin around the stoma can make it difficult for the skin barrier to stick well and may cause pain when you remove it. Shaving with a razor or trimming hair with scissors every couple of changes may be required. If using a straight edge or razor, shave away from the stoma. Dry shaving is sometimes easier. Laser therapy may be an option for a permanent hair removal.
(v) Flatulence (gas)
Right after surgery, you may have a lot of gas. Most abdominal surgery is followed by this uncomfortable, embarrassing, yet harmless symptom. As you start to eat a normal diet and the bowel becomes full of solids the gas will become less. Certain foods may cause gas and may include:
- Eggs
- Cabbage
- Broccoli
- Onions
- Fish
- Beans
- Milk
- Cheese
- Alcohol (beer)
- Cauliflower
- Mushrooms
- Spinach
- Carbonated Soda
- Brussels Sprouts
- Corn
- Peas
- Cucumbers
- Radishes
- Excess Sugar
Although these foods may cause gas they can still be enjoyed. Eating regularly will help prevent gas but skipping meals to avoid gas or output is not recommended, as it actually increases the gas. Some people find it best to eat smaller amounts of food 4 to 6 times a day.
You may be worried about how others will respond to the gassy noises. You will find that these noises sound louder to you than to others. They often only sound like stomach rumblings to those around you. If you are embarrassed by these rumblings when others are nearby you can say, “Excuse me, my stomach’s growling.” If you feel as though you are about to release gas when you are with people, casually fold your arms across your abdomen so that your forearm rests over your stoma. This will muffle most sounds. Check with your ET nurse or pharmacist about products you can take that may help lessen gas, such as Beano®. You may also want to avoid foods that promote gas production – especially in public situations.
(vi) Odor
Many factors, such as foods, normal bacterial action in your intestine, illness, different medicines, and vitamins can cause odor. Once again, some foods can produce odor and may include:
- Eggs
- Cabbage
- Cheese
- Cucumber
- Onion
- Garlic
- Fish
- Dairy foods
- Coffee
- Asparagus
- Broccoli
- Cauliflower
- Brussels Sprouts
If you find that certain foods bother you, avoid them. Some people with colostomies have more trouble with odors than others. Learning by experience is the only solution to this problem. Remember the pouches are odor proof. Here are some hints for odor control:
- Check to see that the skin barrier (flange) is securely attached to your skin.
- Ensure the pouch outlet is clean after emptying and also the clip if your pouch has a clip.
- Place special deodorant liquids and/or tablets in the pouch. If a two-piece pouching system is in place, ensure the system is attached securely.
- There are some medicines that may help. Check with your doctor or pharmacist about these products and how to use them. Some things that many people have found to help with odor are chlorophyll tablets, Devrom® (bismuth subgallate), and bismuth subcarbonate.
- There are air deodorizers that control odor very well when you are emptying the pouch. Immediately flush the toilet after emptying your pouch.
- Dispose of ostomy products in airtight disposable bags.
- Try to keep stool from collecting, or “pancaking” at the top of your pouch, as this can contribute to leaks and wafer undermining. Pancaking is a common annoyance, especially if you are spending a lot of time lying down or sitting. Clothing that restricts the top of the pouch can also cause pancaking. This can also be a sign that more fluids and fibre is needed.
Colostomies tend to emit more odor than ileostomies because of the abundance of bacteria in the colon and the length of time the stool is in the colon before being released into your pouch. Ileostomies experience almost continual peristaltic waves which sweep the ileum and prevent stagnation of the intestinal contents, thereby eliminating much of the bacterial growth. Stool is eliminated sooner with an Ileostomy.
Some people find that their appliances develop an odor that they dislike despite their best efforts to keep everything clean. Everybody’s body chemistry is different and some can wear one brand without annoyance while others think it has an odor. If your appliance is fitting you well, you’re not getting leaks and nobody else can smell anything but you still don’t think it smells right, you might consider trying other brands. Changing the pouch more frequently often helps as well.
B. Choosing a Pouching System
Deciding which pouching system or appliance is best for you is a very personal matter. When you are trying out your first pouching system, it is best to talk with someone who has experience in this area. A nurse or ET nurse is experienced and will get you started with supplies and instructions after surgery. As you are getting ready to leave the hospital, be sure you are properly referred for support. Even with help, you may have to try different types or brands of appliances to find the system that best suits you. (See Section X on Resources)
There are many things to think about when trying to find the pouching system that will work best for you. The length of the stoma, abdominal firmness and shape, the location of the stoma, scars and folds near the stoma, and your height and weight all must be considered. Special changes may have to be made for stomas near the hipbone, waistline, groin, or scars. Some companies have custom-made products to fit unusual situations.
A good pouching system should be:
- Secure, with a leak-proof seal that lasts at least 5 to 7 days
- Odor-resistant
- Protective of the skin around the stoma
- Nearly invisible when covered with clothing
- Easy to put on and take off
(i) Two Piece v.s. One Piece Appliance
A two-piece appliance is composed of two parts: the flange or barrier, which sticks to your skin, and the pouch, which snaps or sticks onto the flange. A one-piece appliance has the flange combined with the pouch. There are advantages and disadvantages to both:
Two-Piece Advantages
- Easier to ‘burp’, that is, allow gas to escape. This is a useful feature if you have an Ileostomy or colostomy and find that filters work poorly once dampened
- A smaller or larger pouch can be substituted without having to change the entire flange – some have a ‘floating flange’ which is a type of flange that allow you to put your fingers under the flange to press the pouch and flange together. This can be an advantage for those with poorer hand dexterity who have difficulty snapping a pouch onto a flange, or for those whose abdomen is very tender and pressing down to attach a pouch is uncomfortable.
- There are flanges that are pre cut or flanges you will stretch them to fit the size of the stoma without using scissors. Both companies Hollister and Convatec have this technology.
- Available with convexity to fit flush, retracted stomas and uneven skin contours.
- Liners may be used to decrease cost of and lengthen the use of the pouch.
- Helps make emptying more easy when using liners. Works well with a colostomy and can be used with an Ileostomy.
Two-Piece Disadvantages
- Tend to be bulkier and more visible under clothing, although with the newer thin and flexible flanges this is less of a problem than in years past
- More appliance ‘inventory’ to purchase, match and keep track of
- Need to be sure 2 pieces are attached together to prevent an accident.
One-Piece Advantages
- Fewer components to apply
- Feel lighter, more flexible and have a lower profile under clothing
- Available with convexity to fit flush, retracted stoma and uneven skin contours.
- Cost maybe less than 2 piece.
One-Piece Disadvantages
- Can cost more if you are using closed-end models (you’ll need to throw them away every time you empty)
- Unable to use liners
(ii) Disposable Pouches
Pouches come in many styles and sizes, but they all do the same job – they collect stool that comes out of the stoma. Some can be opened at the bottom for easy emptying. Others are closed and are taken off when they are full. Still people like to remove the pouch from the skin barrier (2 piece system) to rinse the pouch, and then reuse them. This is a personal preference to rinse and reuse.
Figures 28 through 35 appearing below show you some available ostomy supplies. Along with the different kinds of pouches, other supplies such as barriers, clips, and belts are shown. Some types of pouching systems need these supplies. Pouches are either clear or opaque and come in different lengths.
The skin barrier (flange) may be pre sized, cut to fit or molded to fit the shape of the stoma.

Figure 28: One piece drainable pouch with skin barrier. Figure 29: Tail Closure (clip).
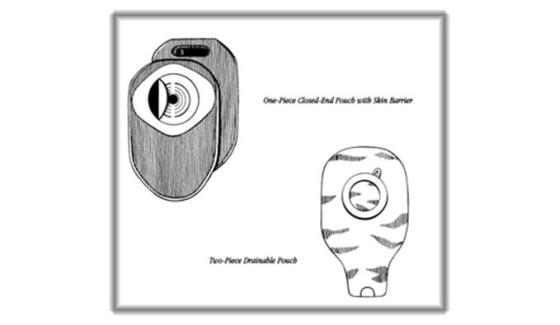
Figure 30: One piece closed end pouch with skin barrier. Figure 31: Two piece pouch
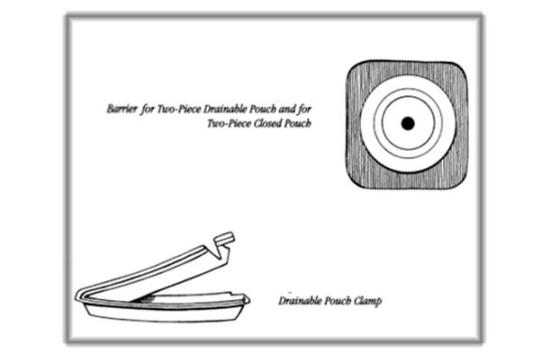
Figure 32: Flange or barrier for two piece drainable pouch or two piece closed pouch. Figure 33: Drainable pouch clamp
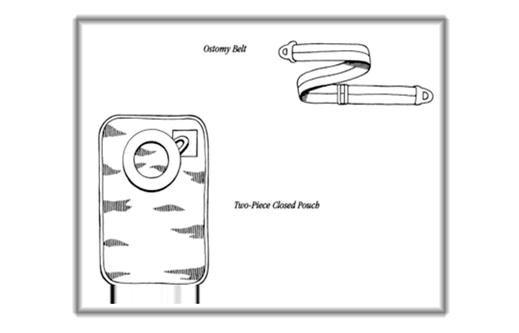
Figure 34: Ostomy Belt. Figure 35: Two piece closed pouch
F. STOMA COVERS/CAPS
A gauze or tissue can be folded neatly, touched with a small amount of water-soluble lubricant, placed over the stoma, and covered with a piece of plastic wrap. Such a dressing may be held on with medical tape, underclothing, or an elastic garment. Plastic, and fabric ready-made stoma caps (Figure 36) are also available. Stoma covers may be used for colostomies that put out stool at regular, expected times. They may also be used if irrigating or for intimate times.

Figure 36: Once piece stoma cap
G. CHANGING THE POUCHING SYSTEM
There may be less bowel activity at certain times in the day. It is easiest to change the pouching system during these times. You may find that early morning before you eat or drink is best. You don’t have to use sterile supplies. The stoma and nearby skin are clean but not sterile. For instance, wash cloth or paper towels can be used in place of sterile gauze pads. The length of time a pouch will stay adhered to the skin depends on many things, such as the weather, skin condition, scars, weight changes, diet, activity, body shape near the stoma, and the nature of the ostomy output.
- Perspiring during the summer months in warm humid climates may shorten the number of days you can wear the pouching system, depending on products used. Body heat, added to outside temperature, may cause skin barriers to loosen more quickly than usual.
- Moist, oily skin may reduce wear time.
- Weight changes will also affect how long you can wear a pouching system. Weight gained or lost after ostomy surgery can change the shape and size of your stoma and abdomen. You may need a new size or an entirely different system.
- Diet may affect your seal. Foods that cause a watery output are more likely to break a seal than a thicker stool.
- Physical activities may affect wear time. Swimming, very strenuous sports, or anything that causes you to perspire may shorten wearing time.
- Accessory items such as an ostomy belt may be needed or you may need a change in the type of barrier (flange) used.
- Paste, ostomy powder, Strip paste may be required
H. PERISTOMAL SKIN CARE
The peristomal skin is where the pouching system is placed. If your skin is damaged, it becomes harder for the skin barrier (flange) to adhere to your skin. When you apply the skin barrier, it’s important to make sure your skin is dry and intact. This will ensure the pouching system stays in place between changes. It’s also important to remember that living with a peristomal skin complication can affect your daily comfort and quality of life. Remember, prevention is the key to maintaining healthy peristomal skin. Should you note changes in your skin, it is important to let your ET Nurse know.
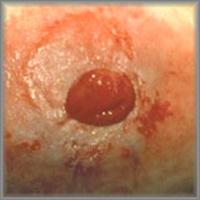
You should make note of how your skin looks when it’s healthy (Figure 37). Peristomal skin should look similar to the skin on the other side of the abdomen (i.e., intact, non-irritated). Once you know what your skin looks like normally, you can watch for signs of possible skin problems which are summarized on the next page.
Healthy Irritated

Figure 37: Comparison of healthy skin to irritated skin.
|
|
I. TYPES OF SKIN CARE PROBLEMS
Having a peristomal skin complication is one of the most common reasons people living with a stoma seek medical attention. Table 2 identifies some of the various skin care problems that might arise, and it is provided courtesy of Convatec which may be accessed at http://www.convatec.com/en/cvtus-typsknprus/cvt-cntsngcol/0/detail/393/1571/1885/types-of-skin-problems.html. Do not hesitate to contact your healthcare professional (ET Nurse or physician) as soon as possible if you suspect one of the following problems:
TABLE 2: POSSIBLE SKIN PROBLEMS
|
Condition |
Causes |
Description |
Care Options |
|
|||
|
|
Contact with stool or urine, usually from leakage under the pouching system or between the skin barrier and stoma. |
Reddened, moist, and painful skin. |
|
|
|||
|
|
Exposure to materials and chemical compounds that irritate the skin on contact (i.e., tape, skin barriers, soap, adhesives, powders, pastes, or pouch material). |
Redness and irritation in the area covered or treated by a product. |
|
|
|
|
|
|
|
|||
|
|
Leakage, perspiration, antibiotic therapy, or broken skin. |
Itchy, bumpy red skin. Potential infection of the vagina, mouth, or intestine. |
|
|
|
|
|
|
|
|
|||
|
|
Chronic exposure of the skin to urine. |
Raised areas that vary in color from white to light gray, deep red or brown, next to the stoma. May experience bleeding and/or pain. |
|
|
|
|
|
|
|
|||
|
|
Inflammation of the hair follicles, usually caused by a Staph infection due to traumatic hair removal in peristomal skin. |
Reddened, pinpoint, or infected areas at the base of the hair follicles. |
|
|
|
|
|
|
|
|
|||
|
|
A common skin disorder that can occur underneath pouching systems and skin barriers. |
Whitish scaly patches on the palms, scalp, elbows, knees and soles and on the peristomal skin. |
|
|
|
|
|
|
|
|||
|
|
Excessive pressure from an ostomy belt or rigid ostomy appliance. |
Painful ulcers due to excessive pressure on the peristomal skin. |
|
|
|
|
|
|
|
|
|||
|
|
Skin disease associated with inflammatory bowel diseases such as Crohn’s disease and ulcerative colitis. |
Irregularly shaped painful infected ulcers with red-to-purple rolled margins. These may be adjacent to the stoma or elsewhere. |
|


References [+]
- Allen S, Best R, Butler S, et al. Canadian Ostomy Assessment Guide. A Canadian Consensus. ConvaTec, A Bristol-Myers Squibb Canada Company. 1998.
- Colwell JC. Stomal and peristomal complications. In: Colwell JC, Goldberg MT, Carmel JE (eds). Fecal & Urinary Diversions: Management Principles. St. Louis, MO. Mosby 2004:308-325.
In the first few months after your operation, your body will need to adapt to your altered bowel function. Your ET Nurse will give you information on what’s best to eat as you recover. After you have recovered fully and the stoma is functioning normally, you should be able to eat a normal healthy diet. If you have had a colostomy, your nurse or surgeon may advise you not to eat foods that may give you gas. He or she may also advise you to eat slowly and not to talk and eat at the same time, to prevent you swallowing too much air, which could cause gas. Charcoal filters may be recommended if gas is problematic. It’s important to keep up your intake of fluids and eat foods that are rich in fibre to make sure you don’t become constipated.

Food is just one of the many things that can affect stoma output. There are no set dietary rules for people with a colostomy. Having an ostomy should not stand in the way of enjoying good food. It may just take a bit of time to find out what works for you.
Here are some general guidelines you may find useful with a colostomy:
- Eat regularly
- Drink plenty of fluids
- Chew your food well
- Enjoy your food and try not to be anxious about it
Below are more specific guidelines, based on a colostomy. You should always ask your healthcare professional about any dietary restrictions you may have or need to follow.
Just like before your surgery, at times you may experience constipation or diarrhea. Increasing your fluid and fiber intake should help prevent constipation. However, please bear in mind that raw fruits and vegetables or their skins may, at times, be hard to pass through your system. Fibre is good for you and necessary for a balanced diet, but you may need to experiment with what agrees and what does not agree with you.
Drink more water and fruit juices — six to eight glasses (48-64 ounces) per day to help safeguard against constipation. After having experimented and determined which foods agree with you, try to include those fresh fruits and vegetables in your diet, as well as those foods that are high in fibre such as whole-grain breads and cereals.
Foods that tend to loosen stool may include:
- Green beans
- Fresh fruits
- Prunes/juice
- Chocolate
- Aspartame/NutraSweet
- Beer
- Grape juice
- Spicy foods
- Spinach
- Broccoli
- Raw vegetables
- Fried foods
- Leafy green vegetables
Diarrhea can be caused by many things, including viruses, antibiotics, and some medicines. It can also be a sign of trouble digesting certain foods. If food is the problem, you can try to eliminate the food causing the problem. If diarrhea persists, talk to your doctor.
Foods that tend to thicken stool, causing slow output may include:
- Applesauce
- Boiled milk
- Creamy peanut butter
- Bread
- Yogurt
- Bananas
- Marshmallows
- Pretzels
- Tapioca
- Bagels
- Cheese
- Pasta
- Rice
-
Toast
B. ILEOSTOMY
Here are some general guidelines you may find useful when dealing with an ileostomy:
- Eat regularly
- Drink plenty of fluids
- Chew your food well
- Enjoy your food and try not to be anxious about it
- Talk to your ET Nurse or a dietician about vitamin supplements
-
Try new foods one at a time, in small quantities, so that if there is a problem, you will have an idea what caused it.
- Below are more specific guidelines, based on an ileostomy. You should always ask your healthcare professional about any dietary restrictions you may have or need to follow.
- After your recovery from surgery, you can gradually resume eating a balanced diet, unless your physician requires you to follow a special diet. Chew your food well to help break it down into smaller pieces. And be sure to drink plenty of fluids, approximately 8-10 glasses per day to prevent dehydration.
- Some foods will help to thicken the output from and Ileostomy. These are the same foods listed under the colostomy section. They can make changing your flange easier if the stool has a thicker consistency. It also helps you have better nutritional benefit from your food as it may stay in your system longer before being expelled.
- Your healthcare professional may ask you to avoid high-fibre foods the first six to eight weeks only after surgery. These high fibre foods may cause a blockage and consist of:
- Celery
- Popcorn
- Chinese vegetables
- Coconut
- Raw pineapple
- Coleslaw
- Raisins (and other dried fruit)
- Mushrooms
- Nuts and seeds
- Salad greens
- Peas
- Fruit & Vegetable skins
- Relishes
- Dried fruit
- Meats with casings
- Grapefruit
- Oranges
After ostomy surgery, the way your body digests and absorbs medicines may be affected. Prescription and non-prescription drugs as well as vitamins are absorbed primarily through the intestines; therefore, if you have had a significant portion of your bowel removed, absorption of these substances may be affected. While the chemical nature of most drugs allows absorption along a significant length of the intestinal tract, the shorter the functional intestine, the less will be absorbed. Absorption of medications can vary depending on the size and type of pill (i.e. tablet or capsule).Enteric coated tablets, large tablets and time release capsules may not be absorbed. Chewable tablets are effective if they are chewed well; in most cases they are better absorbed than capsules or compressed tablets. Make sure to review all of your medicines, both over-the-counter and prescription, with your ET Nurse, healthcare professional, and pharmacist.
You can test your medication by placing a tablet in a glass of water for 30 minutes. If the tablet has begun to dissolve it usually can be adequately absorbed.
Some medications may be prescribed by your Doctor to help slow down the transit time of your stool. This will help to thicken the stool consistency, decrease the number of times your pouch is emptied and help with the absorption of your food and prevent dehydration.
Imodium, Codeine, and Lomotil will help to thicken stool and slow down the transit time of your stool.
Some of the medicines whose absorption may be affected in a person with an ileostomy may include:
- Antacids
- Anti-diarrheals Birth Control, Oral Contraceptives
- Anti-inflammatory agents, such as Ibuprofen
- Aspirin
- Laxatives
- Salt substitutes
- Sugar substitutes, such as Saccharin
- Vitamins
STOMA BLOCKAGE
The key to prevention of a food blockage is to chew your food well.
The Ileostomy is made from a narrow piece of ileum (about 1″ in diameter) that can accumulate undigested high fibre foods and a stenosed stoma (partially narrowed) can cause a partial or total blockage.
Symptoms are: Cramping, diarrhea, no output from your Ileostomy or only water, vomiting, swelling of the stoma and abdomen.
Management of a Food blockage:
If not vomiting drink plenty of warm clear fluids such as clear soup, tea. Drink one glass of liquid each time the pouch is emptied. Grape juice may act as a mild cathartic and may help to dislodge the blockage.
Warm tub bath or shower to relax abdominal muscles.
Massage your abdomen, lie down and bring your knees to a knee chest position and rock from side to side.
If the stoma is swollen remove the flange and replace with a larger opening.
Notify your ET Nurse or Physician or go to Emergency:
If Stool output stops (complete blockage)
Signs of a partial obstruction are persistent (abdominal cramps, nausea and vomiting)
Signs of dehydration resulting in fluid and electrolyte imbalance such as: dry mouth, dizziness when getting up, nausea vomiting and confusion, increased urine concentration, decreased urination, sunken eyes, muscle cramps, lethargy, and flaccid muscles. If these signs are present you may require IV fluids to replace the fluids your body has lost.
Fluids to help prevent Fluid and Electrolyte imbalance are:
High in Potassium: V-8 juice, Gatorade, Orange juice
High in Sodium: Canned soups, chicken bouillon

Whether you play tennis, golf, enjoy jogging, swimming, skiing, or yoga, you can still stay active. With your healthcare professional’s permission, you can go back to the same sports and activities you engaged in before your surgery.
Everyone needs daily exercise to keep good health and body function. An ostomy should not keep you from exercising and playing sports. Check with your doctor about engaging in sports.
Water will not hurt the stoma. You can take a bath or shower with or without a pouching system in place. Normal exposure to air or contact with soap and water will not harm the stoma.
You can swim or go in a hot tub with your pouching system in place. Remember these points:
- If you use a support ostomy belt, you can leave it on if you want to.
- You may want to protect the barrier (flange) by taping the edges with waterproof tape.
- You may want to choose a swimsuit with a lining for a smoother profile. Dark colors or busy patterns can also help camouflage the pouching system. Women may want to choose a suit with a well-placed skirt or ruffle. Men may want to try a suit with a higher waist band or longer leg.
- Women may wear stretch panties made especially for swim suits.
- Men may want to wear bike shorts or a support garment sold in men’s underwear departments or athletic wear departments under their bathing suits.
- Men may prefer to wear a tank top and trunks, if the stoma is above the belt line.
- Before swimming, empty your pouch.
- After swimming dry your pouch off with a towel or hair dryer on low.
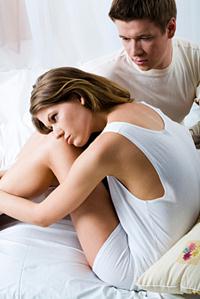
PART VIII: INTIMACY AND SEXUALITY
Sexual relationships and intimacy are important and fulfilling aspects of your life that should continue after ostomy surgery. But there is a period of adjustment after surgery. Your attitude is a key factor in re-establishing sexual expression and intimacy. Any sexuality concerns you have are best discussed openly between you and your partner. A stoma on the abdomen is quite a change in how you look and can make you feel anxious and self-conscious. It is likely that your partner may be anxious about sexual activities, too, perhaps being afraid of hurting your stoma or dislodging the pouch. Talk to your partner about the fact that sexual activity is not likely to harm the stoma. Try to be warm, tender, and patient with each other.
The first time you become intimate after surgery, things may not go perfectly. Men may have trouble getting and keeping an erection and women sometimes have pain during intercourse. These problems usually get better with time. Your interest in sex is likely to return as your strength returns and you get better at managing your pouching system. If the pouch or stoma covering seems to be in the way during sex, try different positions or use small pillows to take pressure off the stoma.
Having an ostomy does not mean intimacy has to come to an end. Meaningful and fulfilling intimate encounters are still possible. Communication and trust are at the heart of the healing process. It is normal to feel sensitive about the change in your body. Share your feelings with your spouse or loved one, and respond to his or her concerns as well. Let your partner know that sexual relations will not hurt your stoma. With time, understanding, and a positive attitude, you can enjoy a mutually satisfying sexual relationship. Convatec, a manufacturer of ostomy supplies, has some helpful suggestions on ways to enhance intimacy for men and women:
- Empty your pouch before beginning sexual relations
- Wear a small pouch – Specialty pouches are available that are designed to be smaller and less bulky, for intimate moments
- Cover your pouch with specially designed underwear, lingerie, or pouch covers if you feel uneasy about your partner seeing it. You may consider wearing crotch-less panties, teddies, or a short slip or nightie.
- Remember that you may not have an orgasm the first time you have sex following surgery. If you find that you are having continued problems, inform your health care provider.
- After surgery, many women experience vaginal dryness. Try one of the many lubricants available, or ask your doctor about a hormone cream or vaginal suppository.
- If you use birth control, oral contraceptives may not be the best choice, especially if you have had an ileostomy or if a large portion of your large intestine was removed. In such cases, the pills are often not absorbed. Talk to your doctor about the best form of birth control for you.
- Talk to your partner. The more you share about your ostomy and how you feel, the greater the intimacy becomes between you and your partner.
- The way you see yourself influences the way others see you. If you are accepting of your body after surgery, your partner is likely to be as well.
- If one sexual position causes you pain or trouble, try another.
- The side by side position works well for people with ostomies because the pouch will fall to your side and not come between you and your partner.
- Pregnancy is possible for women who have had ostomy surgery. But before you plan to get pregnant you should talk about it with your doctor. If you are healthy, the risk during childbirth appears to be no greater than for other mothers. Of course, any other health problems must be considered and discussed with your doctor. The stoma may change in size during pregnancy and may require a different flange and pouch and after the delivery you should be able to return to your original flange and pouch.
B. For Men (♂)
- Empty your pouch before beginning sexual relations.
- Wear a small pouch—Specialty pouches are available, that are designed to be smaller and less bulky, for intimate moments.
- Cover your pouch with specially designed underwear or pouch covers if you feel uneasy about your partner seeing it. You may consider wearing a cummerbund around the midsection to secure the pouch. And there are many types of pouch covers that can be purchased or you can make your own.
- Remember that you may not have an orgasm the first time you have sex following surgery. You may also experience difficulty having or maintaining an erection based on the type of surgery performed. If you find that you are having continued problems with erectile function, call your healthcare provider. Talk with your partner! The more you share about your ostomy and how you feel, the greater the intimacy becomes between you and your partner.
- The way you see yourself influences the way others see you. If you are accepting of your body after surgery, your partner is likely to be as well.
- If one sexual position causes you pain or trouble, try another.
- The side-by-side position works well for people with ostomies because the pouch will fall to your side and not come between you and your partner.
Ostomy surgery may present more concerns for single people. When to tell that special someone depends on the relationship. If the relationship grows and is leading to physical intimacy, your partner needs to be told about the ostomy before a sexual experience.
The American Cancer Society has designed a document that supplies more information on Sexuality for the Man with Cancer, or Sexuality for the Woman with Cancer. Please click on the links provided to access more information.
Hollister, a manufacturer of ostomy supplies, also has a pamphlet dedicated to ostomy and sexuality and may be accessed by clicking on the following link: http://www.hollister.com/uk/ostomy/resource/love.html .
All methods of travel are open to people with an ostomy. Many people with ostomies travel just like everyone else; this includes camping trips, cruises, and air travel. Here are some travel tips:
- Take along enough supplies to last the entire trip plus some extras. Double what you think you may need, because supplies may not be easy to purchase where you are going. Even if you don’t expect to change your pouch, take along everything you need to do so. Plastic bags with sealable tops may be used for pouch disposal. Leave home fully prepared. Find out if and where you can get supplies before a long trip. A local ostomy support group may be able to help you find ostomy supplies and local medical professionals. Check with the United Ostomy Association of Canada ( www.ostomycanada.ca ). You can check with the company whose product you are wearing for a list of places to purchase your supplies when away.
- Seat belts will not harm the stoma when adjusted comfortably. You may want to use a stoma guard or seat belt clip.
-
When traveling by car, keep your supplies in the coolest part of the car. Avoid the back window ledge or glove compartment.
When traveling by plane, remember that checked-in luggage sometimes gets lost. Carry all pouching system and other supplies on the plane with you. Air travel security will generally let you take on all medical supplies.
- Before traveling abroad, get a current list of English-speaking doctors in the areas you will be visiting. The International Association for Medical Assistance to Travelers (IAMAT) at 716-754-4883 begin_of_the_skype_highlighting or www.iamat.org publishes lists of English speaking doctors who were trained in North America or Europe in over 2,500 cities around the world.
- Traveler’s diarrhea is a common problem for tourists in foreign countries, whether you have an ostomy or not. The most common cause of diarrhea is impure water and/or food. It may also be caused by changes in food or climate. Be sure drinking water is safe. If the water is not safe, do not use the ice either. Bottled water or boiled water is recommended. Your doctor can give you a prescription for medicine to control diarrhea. Get it filled in your home city before you leave so that you can take the medicine with you just in case you need it. You can also purchase quick release Imodium before you travel.
- Pre cut all barriers at home—this way you can leave your ostomy scissors in your checked luggage. After the events of September 11, security has been heightened in numerous international airports, making the carrying of scissors in your carry-on more difficult.
- Carry a statement from your healthcare professional or ET Nurse to show security your need for ostomy supplies, in case you are asked about your ostomy products. Further problems might be avoided by having this information translated into the language or languages of the country(s) you are visiting. One of the 70 member associations of the International Ostomy Association can be helpful with translations. This may help you locate supplies while traveling abroad.
With the introduction of full body scanners, people with an ostomy may feel an invasion of privacy. Empty your pouch prior to being scanned if possible. It may be helpful to contact the United Ostomy Association of Canada (www.ostomycanada.ca ) regarding the development of special cards explaining the “condition” which could be presented at the point of scanning. Remember, all screening at airports must be conducted in a way that treats passengers with courtesy, dignity, and respect. You may request that any personal screening be conducted in a private area. Also your ET Nurse can provide you with a letter and a booklet demonstrating the type of ostomy you have which may assist you when going through security.
PART X: RESOURCES FOR THE OSTOMATE
The following resources may assist the ostomate and caregiver. Feel free to contact them should you have additional questions or concerns.
www.ostomycanada.ca – United Ostomy Association of Canada, Toll free number: 1 888 969 9698
www.uoaa.org – United Ostomy Association of America, Toll free number: 1 800 826 0826
www.ostomyinterantional.org – Ostomy International, Toll free number: 1 800 826 0826
www.j-pouch.org – J-Pouch
www.wocn.org, Toll free number: 1 888 224 9626
B. Vendors:
www.coloplast.ca Toll free number: 1 877 820 7008
www.convatec.ca Toll free number: 1 800 465 6302
www.hollister.com/canada/ Toll free number: 1 800 263 7400
www.cymedostomy.com Toll free number: 1 800 582 0707 (located in California)
www.nu-hope.com Toll free number: 1 800 899 5017 (located in California)
www.marlenmfg.com Tel: 216 292 7060 (Located in Ohio)
www.intimatemomentsapparel.com Tel: 201 825 9486 (Located in New Jersey)
www.ostomysecrets.com Toll free number: 1 877 613 6246 (Located in Florida)
About.com, http://ibdcrohns.about.com/
American Cancer Society, www.acs.org
American Society of Colon and Rectal Surgeons, www.ascrs.com
Canadian Association of Enterostomal Therapists, http://www.caet.ca
Canadian Cancer Society, www.ccs.org
Convatec, www.convatec.com/
Colostomy, www.colostomy.com/
Digestive Diseases, http://digestive.niddk.nih.gov/
Digestive Disorders, http://digestive-disorders.health-cares.net/colostomy.php
International Ostomy Association, www.ostomyinterantional.org
Medicine Online, http://www.medicineonline.com/articles/c/2/Colostomy.html
Ministry of Health and Long Term Care, Ontario, http://www.health.gov.on.ca/english/public/pub/adp/ostomy.html
National Cancer Institute, https://cissecure.nci.nih.gov/ncipubs/home.aspx?js=1
National Institute of Health, http://www.nlm.nih.gov/medlineplus/ostomy.html
Ostomy Care and Management, Clinical Best Practice Guidelines, RNAO http://www.rnao.org/Storage/59/5393_Ostomy_Care_Management.pdf
Ostomy Software, http://www.ostomysoftware.com/Colorectal-Cancer.html
Providence Health Care, http://www.providencehealthcare.org/about_hr_stpauls_main.html
Surgery Channel, www.surgerychannel.com/colostomy/
Stoma, http://stomastomata.com/
The J-Pouch Group, www.j-pouch.org
United Ostomy Associations of America, http://www.ostomy.org and www.uoaa.org
United Ostomy Association of Canada, www.ostomycanada.ca
Wound, Ostomy and Continence Nurses Society, www.wocn.org,
Images:
Figure 1 – The Human Digestive System http://web.lemoyne.edu/~hevern/psy340_10S/lectures/psy340.10.3.hunger.html
Figure 2 – Surgical Resection of a Colorectal Tumor: http://www.beliefnet.com/healthandhealing/getcontent.aspx?cid=14797 and http://cmcludhiana.in/departments/surgicalspecialties/stomaclinic.php
Figure 3 – Creation of a stoma http://ostomyland.com/mainsite/chapter-4-what-does-a-stoma-look-like/
Figure 4 – Position of a Stoma http://www.bupa.co.uk/individuals/health-information/directory/s/stoma-care
Figure 5 – Descending Colostomy http://www.colostomy.com/
Figure 6 – Transverse Colostomy http://www.ostomysupport.org/colostomy.asp
Figure 7 – Ascending Colostomy http://www.ostomysupport.org/colostomy.asp
Figure 8 – Ileostomy http://www.upstate.edu/surgery/healthcare/colorectal/ileostomy.php
Figure 9 – Types of Ostomy http://digestive.niddk.nih.gov/ddiseases/pubs/ileostomy/
Figure 10 – Ascending Colostomy http://www.restoredimages.com/ostomy.php
Figure 11 – Transverse Colostomy http://www.restoredimages.com/ostomy.php
Figure 12 – Loop Transverse Colostomy http://www.cancer.org/Treatment/TreatmentsandSideEffects/PhysicalSideEffects/Ostomies/ColostomyGuide/colostomy-types-of-colostomies
Figure 13 – Double Barrel Transverse Colostomy http://www.cancer.org/Treatment/TreatmentsandSideEffects/PhysicalSideEffects/Ostomies/ColostomyGuide/colostomy-types-of-colostomies
Figure 14 – Descending Colostomy http://www.restoredimages.com/ostomy.php
Figure 15 – Sigmoid Colostomy http://www.restoredimages.com/ostomy.php
Figure 16 – Descending Colostomy vs. Sigmoid Colostomy http://www.cancer.org/Treatment/TreatmentsandSideEffects/PhysicalSideEffects/Ostomies/ColostomyGuide/colostomy-types-of-colostomies
Figure 17 – End Colostomy http://archive.student.bmj.com/issues/08/05/education/206.php
Figure 18 – Hartmann’s Procedure http://archive.student.bmj.com/issues/08/05/education/206.php
Figure 19 – Hartmann’s Procedure and Mucous Fistula http://archive.student.bmj.com/issues/08/05/education/206.php
Figure 20 – End Ileostomy http://archive.student.bmj.com/issues/08/05/education/206.php
Figure 21 – Brooked Spout http://archive.student.bmj.com/issues/08/05/education/206.php
Figure 22 – Nasogastric Tube http://nursingcrib.com/demo-checklist/inserting-a-nasogastric-tube/
Figure 23 – Ostomy Appliance http://www.cancer.org/Treatment/TreatmentsandSideEffects/PhysicalSideEffects/Ostomies/ColostomyGuide/colostomy-types-of-colostomies and http://soayacs.blogspot.com/2009/03/my-ostomy.html
Figure 24 – Patch Testing Without Adhesive http://www.cancer.org/Treatment/TreatmentsandSideEffects/PhysicalSideEffects/Ostomies/ColostomyGuide/colostomy-types-of-colostomies
Figure 25 – Patch Testing With Adhesive http://www.cancer.org/Treatment/TreatmentsandSideEffects/PhysicalSideEffects/Ostomies/ColostomyGuide/colostomy-types-of-colostomies
Figure 26 – Reaction to Tested Material http://www.cancer.org/Treatment/TreatmentsandSideEffects/PhysicalSideEffects/Ostomies/ColostomyGuide/colostomy-types-of-colostomies
Figure 27 – Reaction to Tape Only http://www.cancer.org/Treatment/TreatmentsandSideEffects/PhysicalSideEffects/Ostomies/ColostomyGuide/colostomy-types-of-colostomies
Figure 28 – One Piece Drainable Pouch with Skin Barrier http://www.cancer.org/Treatment/TreatmentsandSideEffects/PhysicalSideEffects/Ostomies/ColostomyGuide/colostomy-types-of-colostomies
Figure 29 – Tail Closure http://www.cancer.org/Treatment/TreatmentsandSideEffects/PhysicalSideEffects/Ostomies/ColostomyGuide/colostomy-types-of-colostomies
Figure 30 – One Piece Closed End Pouch with Skin Barrier http://www.cancer.org/Treatment/TreatmentsandSideEffects/PhysicalSideEffects/Ostomies/ColostomyGuide/colostomy-types-of-colostomies
Figure 31 – Two Piece Drainable Pouch http://www.cancer.org/Treatment/TreatmentsandSideEffects/PhysicalSideEffects/Ostomies/ColostomyGuide/colostomy-types-of-colostomies
Figure 32 – Flange For Two Piece Drainable Pouch and for Two Piece Closed Pouch http://www.cancer.org/Treatment/TreatmentsandSideEffects/PhysicalSideEffects/Ostomies/ColostomyGuide/colostomy-types-of-colostomies
Figure 33 – Drainable Pouch Clamp http://www.cancer.org/Treatment/TreatmentsandSideEffects/PhysicalSideEffects/Ostomies/ColostomyGuide/colostomy-types-of-colostomies
Figure 34 – Ostomy Belt http://www.cancer.org/Treatment/TreatmentsandSideEffects/PhysicalSideEffects/Ostomies/ColostomyGuide/colostomy-types-of-colostomies
Figure 35 – Two Piece Closed Pouch http://www.cancer.org/Treatment/TreatmentsandSideEffects/PhysicalSideEffects/Ostomies/ColostomyGuide/colostomy-types-of-colostomies
Figure 36 – One Piece Stoma Cap http://www.cancer.org/Treatment/TreatmentsandSideEffects/PhysicalSideEffects/Ostomies/ColostomyGuide/colostomy-types-of-colostomies
Figure 37 – Healthy and Irritated Peristomal Skin http://convatec.com/en/cvtus-prstsknhus/cvt-portallev1/0
Tables
Table 1: Functions of the Various Digestive Organs
Table 2: Possible Skin Problems – http://convatec.com
Photos
Photo A: End Stoma – https://www.c3life.com/ostomy/ostomybasics/loopstoma/default.aspx
Photo B: Loop Stoma – https://www.c3life.com/ostomy/ostomybasics/loopstoma/default.aspx
Photo C: Double Barrel Stoma Together – https://www.c3life.com/ostomy/ostomybasics/loopstoma/default.aspx
Photo D: Double Barrel Stoma Separated – https://www.c3life.com/ostomy/ostomybasics/loopstoma/default.aspx
Photo E: Irrigation Process – http://www.webmd.com/ibd-crohns-disease/ulcerative-colitis-10/slideshow-surgery
